

To streamline your proposal workflow in FigsFlow, bulk-import clients, build a reusable proposal template, and automate emails for every stage. Match what you send to the client’s decision stage, bundle services and catch-up fees into one proposal, set automatic reminders, and track signatories in the Proposals hub to see exactly who is holding up a deal.
FigsFlow is built to remove that friction at every stage. These nine tips cover the parts of the platform that make the biggest practical difference to your proposal workflow, from first contact to signed engagement.
Tip 1: Import Your Client List in Bulk Before You Start
Adding clients one by one before generating a single proposal wastes time before the work has even begun. FigsFlow lets you import your entire contact base in one upload.
Go to Contacts and use the bulk import option to drag and drop your file directly into the uploader.

The uploaded document must follow a specific formatting structure to map your data correctly. You can access and review this required format by clicking the Excel icon located in the top-right corner of the import screen.
Once imported, every contact is instantly available as a point of contact when generating proposals. You only have to enter your data once to make it accessible across the entire platform.
Tip 2: Build Your Proposal Template Once, Use It Every Time
Sending a proposal with a blank cover page or no firm branding costs you the first impression before the client reads a single word. Rebuilding the same elements for each client is one of the most avoidable drags on the proposal workflow. FigsFlow’s template editor lets you configure every element in advance.
Go to Templates and open the Proposal tab. Open your existing template or create a new one.
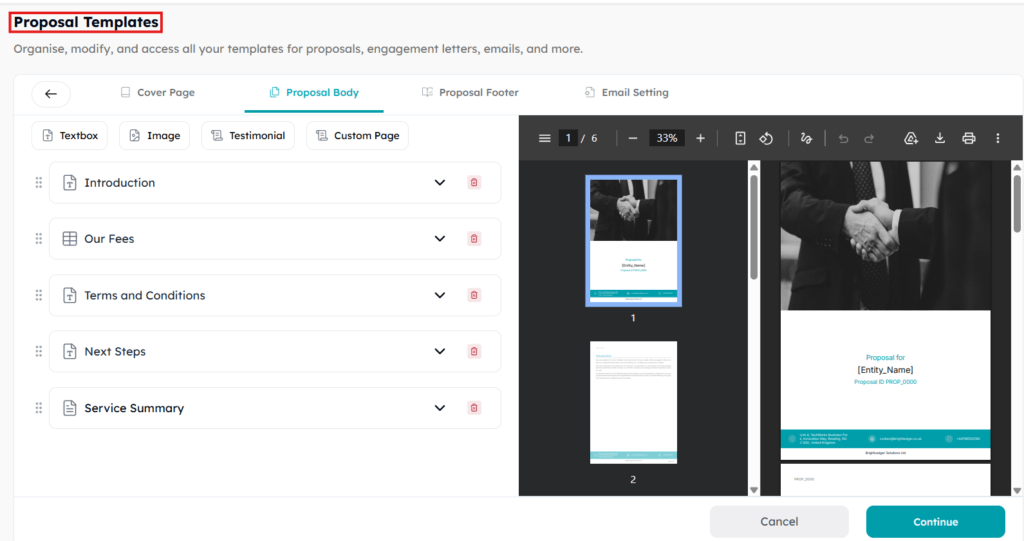
The Cover Page tab lets you upload your firm logo and a cover image. That cover image is where firms typically place a team photo or a welcoming visual for new clients.
The Proposal Body tab controls every section a client reads after the cover. The default sections are Introduction, Our Fees, Terms and Conditions, Next Steps, and Service Summary. You can add a Textbox, Image, Testimonial, or Custom Page at any point in the body.
The Proposal Footer tab holds your firm’s contact details: company name, description, contact number, email, website, and address. This appears consistently at the base of every page.
Once the template is saved, it is available to select every time you generate a proposal.
Tip 3: Set Up Automated Emails for Every Proposal Stage
Without pre-configured emails, every proposal trigger requires someone on your team to manually write and send a message. That manual step is where follow-ups get missed and delays compound.
Inside the template editor, open the Email Setting tab. This is where you link a pre-built email template to each trigger in the proposal lifecycle.
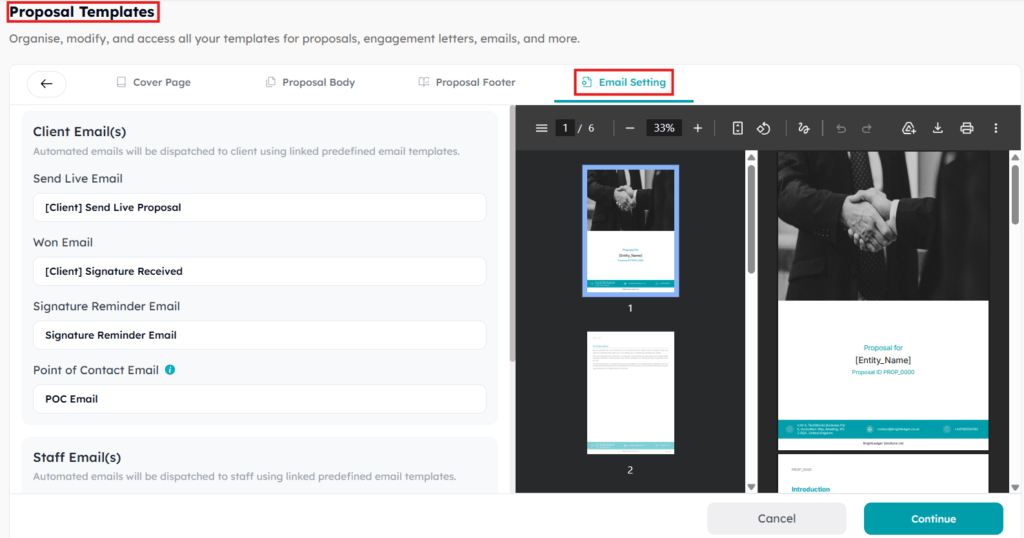
For client emails, you can link a template to: the moment the proposal goes live, the moment the signature is received, and the signature reminder. For staff emails, you can link a template to: send live notification, signature received notification, and the proposal being marked as lost.
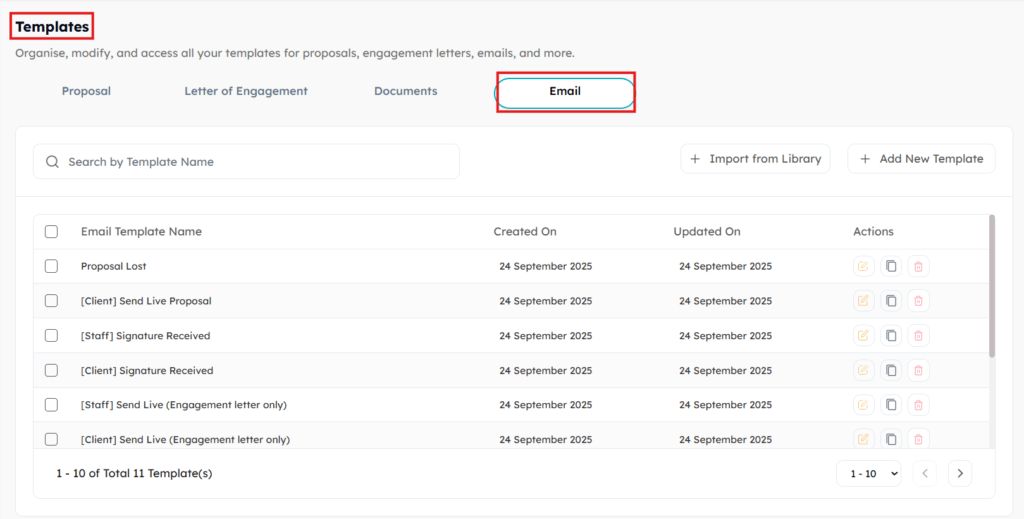
To edit or create the email templates themselves, go to Templates and open the Email tab. FigsFlow loads 11 pre-built email templates covering every trigger for both proposal and engagement letter workflows. You can edit any of them, create new ones, or import from the template library.
Once linked, these emails fire automatically at each stage without any manual intervention from your team.
Tip 4: Match What You Send to Where the Client Is in the Decision
Sending a full proposal to a client who has already verbally committed to working with you creates unnecessary friction. Sending only an engagement letter to a client who is still evaluating you removes the context they need to say yes. Getting this wrong delays the signature either way.
FigsFlow gives you three sending options at the bottom of the Generate Proposal screen.
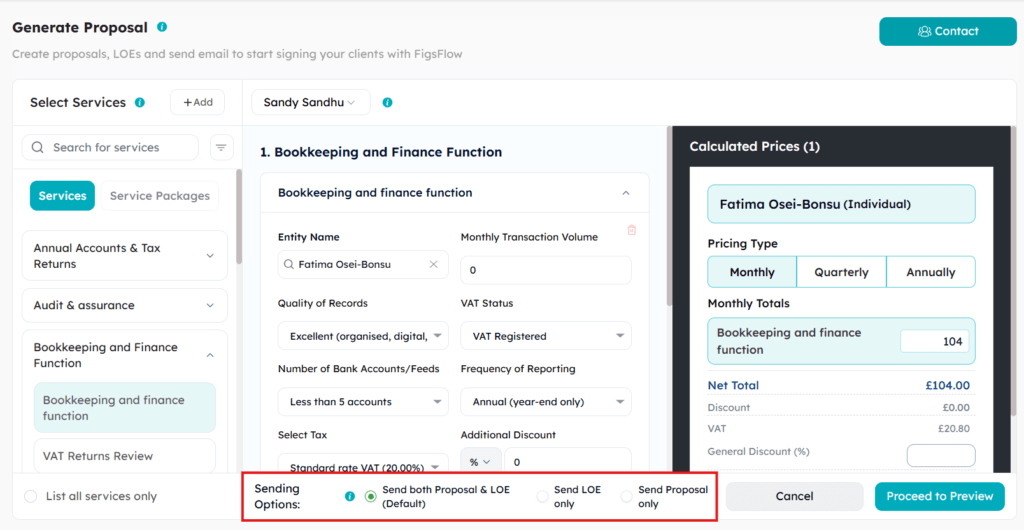
| Client Stage | Sending Option |
|---|---|
| Already committed, ready to engage | Send LOE only |
| Considering but warm, needs the full pitch | Send both Proposal and LOE |
| Needs to review scope and pricing first | Send Proposal only |
Choose the option that matches where the client actually is. A client who has already agreed scope verbally does not need to be sold to again. Give them the engagement letter and close the deal.
Tip 5: Add Associated Services and Catch-Up Fees in the Same Proposal
Sending a second proposal or a separate engagement letter to add a service you forgot, or to bill for backlog work, creates confusion and delays. The client expects one document. A second one raises questions.
Both associated services and catch-up fees are configurable within each service panel on the Generate Proposal screen.
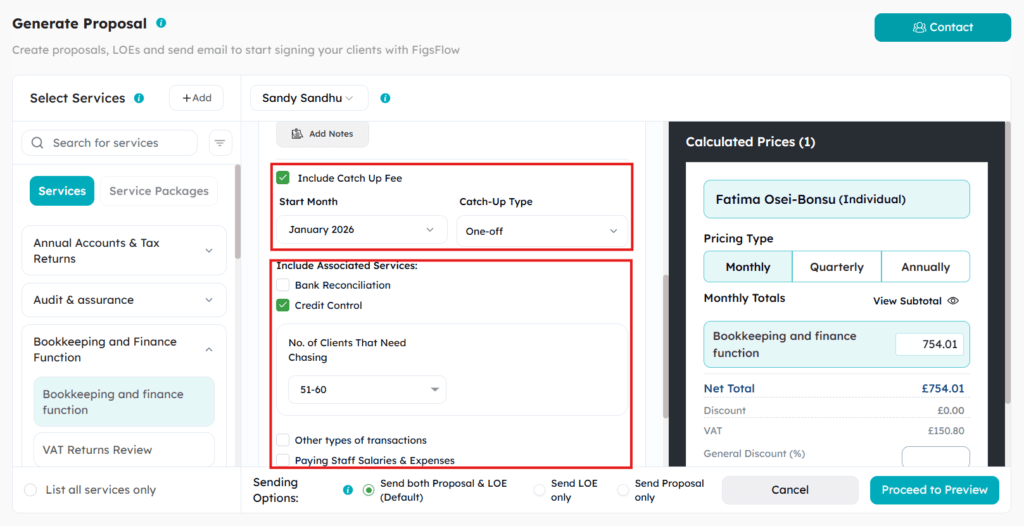
The catch-up fee toggle appears inside each service configuration panel. Switch it on, set the start month and the catch-up type, and FigsFlow calculates the fee separately and adds it to the proposal total as a one-off line item.
Associated services are pre-linked to each core service in the library. Toggle on whichever apply. Their fees calculate automatically and roll into the gross total.
Everything lands in one proposal. No follow-up documents required.
Tip 6: Set a Custom Reminder Timeline on Every Proposal You Send
A proposal that goes out without a reminder schedule is a gap in the proposal workflow that relies entirely on someone remembering to follow up manually. FigsFlow’s reminder feature removes that dependency entirely.
Configure it in the preview screen, before you send the proposal live.
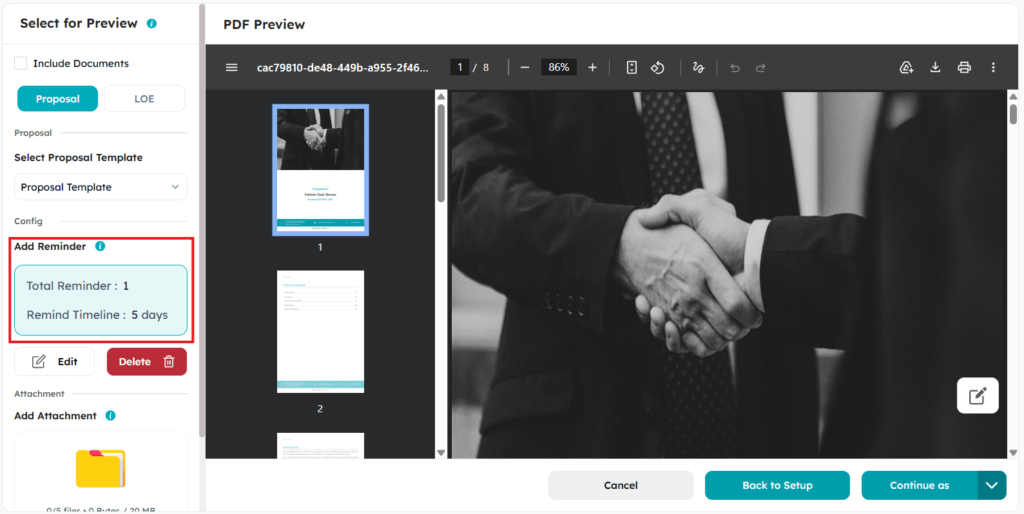
Click Add Reminder and set the number of reminders and the interval in days. The reminder sequence starts from the date the proposal goes live and stops automatically the moment the client accepts. You do not need to cancel it manually or check whether it is still running.
Set this on every proposal before you click Send. It costs nothing and removes an entire category of manual follow-up from your team’s workload.
Tip 7: Attach Supporting Documents Directly to the Proposal
Sending your terms of business, a welcome pack, or a firm brochure in a separate email after the proposal creates a disjointed first impression. It also means the client has documents scattered across their inbox rather than in one place.
FigsFlow lets you attach up to 5 files, with a combined limit of 20 MB, directly within the preview screen before sending.
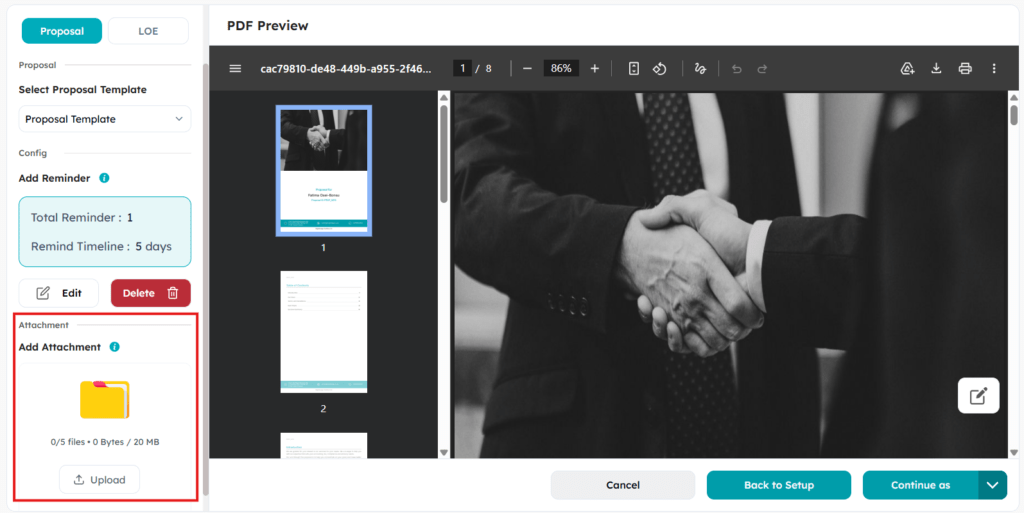
Click Add Attachment, upload your files, and they are delivered to the client as part of the same email that carries the proposal link. The client opens one link and finds everything they need.
Tip 8: Skip the Proposal Entirely for Returning Clients
For existing clients being re-engaged on a familiar scope with similar terms, building and sending an individual proposal each time is unnecessary. You already have the relationship. What you need is the engagement letter, signed and on file.
FigsFlow’s Bulk LOE feature handles exactly this. Go to the Proposals tab and select Bulk LOE. Choose the contacts you want to re-engage, select the service, review the entity list, and proceed to preview. FigsFlow generates one engagement letter per entity in a single run.

The preview shows the letter for the first entity on the list. The structure applies to all entities in the batch. You can edit shared content such as terms and conditions and signature blocks, and the change updates across all letters at once. Individual details such as the client name and primary contact populate automatically.
This is particularly useful when re-engaging a batch of clients at the start of a new tax year.
Tip 9: Use the Proposals Hub to Find Out Who Is Holding Up a Deal
Signatory bottlenecks are one of the most common points where the proposal workflow stalls. When a deal has multiple signatories and nothing is moving, the standard response is a general chase email to everyone. That wastes goodwill on people who have already signed and sometimes irritates the one person you need to move.
The Proposals hub shows you exactly where each deal stands, down to the individual signatory.
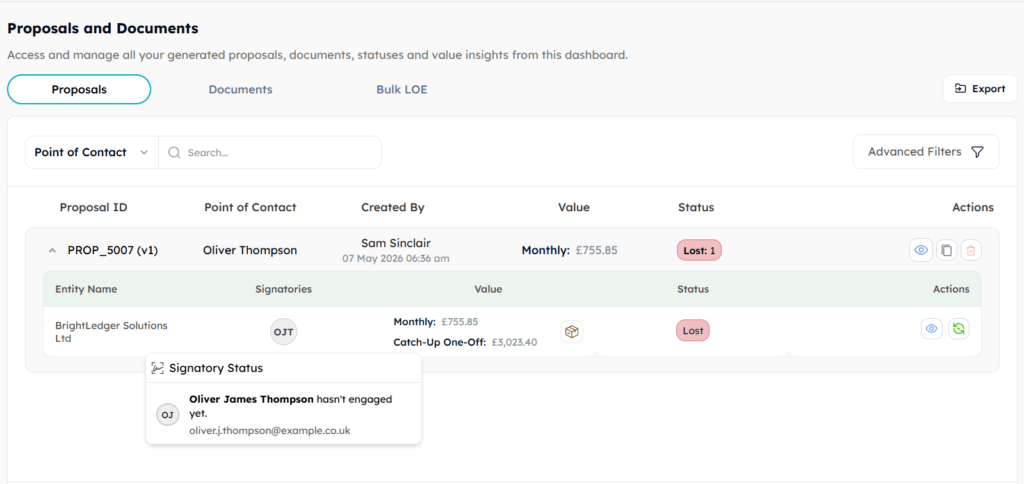
Each proposal entry shows the point of contact, the value, and the status. Expand the entry and you see every entity, every signatory, and whether that specific person has seen the document or not. Status labels are live, seen, lost, and won.
If one signatory has viewed the proposal and another has not, you know exactly who to follow up with and can send a targeted message instead of a blanket chase.
Bonus Tip: Use Roles to Control What Each Team Member Can Access
Giving every member of your team full platform access creates risk. A junior staff member with permission to send proposals live or delete templates can cause problems that take time to undo.
FigsFlow’s role management system lets you define exactly what each person can see and do. Go to Settings and open the Roles tab.
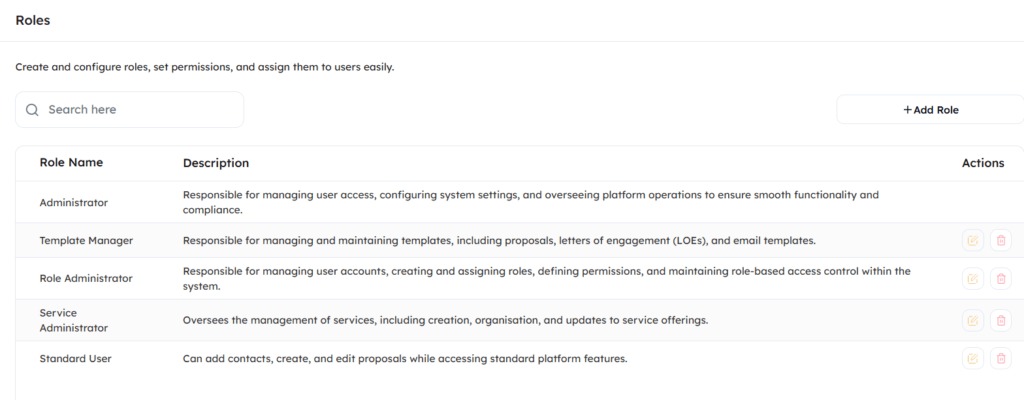
FigsFlow includes five pre-built roles: Administrator, Template Manager, Role Administrator, Service Administrator, and Standard User. If none of these fit a specific team member’s responsibilities, create a custom role. The permission builder lets you set access at the module level, covering the Dashboard, General Settings, Services, Contacts, Templates, Proposals, Report Operations, Role Settings, and Users, with separate toggles for Create, Read, Update, and Delete on each module.
A standard member of staff who creates and edits proposals but should not be able to delete templates or manage users gets exactly those permissions and nothing more.
Conclusion
The bottlenecks in most proposal workflows are not the writing. They are the setup that was never done, the follow-up that was forgotten, and the documents sent in three separate emails instead of one.
Firms that build a structured proposal workflow inside FigsFlow, with templates configured, emails automated, and signatory tracking active, close faster and chase less. Configure it once and let the workflow run.