
You customise proposal templates using FigsFlow in one of two ways. You set up a firm wide template once, so every proposal you send carries your branding, your expertise, and the standard sections you want every client to read. Or you open a single proposal and tailor it for one client, swapping in service-specific testimonials, sharpening a service description, and attaching the documents that close the deal.
Most firms jump straight to editing individual proposals and never touch the template. That gets the effort backward.
This article shows you both ways to customise proposal templates, what each one controls and which to reach for when.
Why Customise Proposal Templates
A generic proposal competes on one thing: price. If a client cannot see why your firm fits their situation, they pick the cheapest quote in the inbox. Personalising to client needs is not a nice to have. It decides whether you are considered or skipped.
Two layers do that work, and the first happens on its own. Build a proposal from a FigsFlow template, and it arrives already personalised. The client’s name, their entity, the services selected, the fee drivers behind each line, all of it flows in from pricing. They read it and feel it was written for them.
Customisation is the second layer, and it is the one that earns trust. Your logo, your fonts, your colours, the faces of your team, testimonials from clients like them. That is what tells a prospect you are an established firm worth committing to, not a quote pulled off a shelf. A generic, unbranded template says nothing about who you are. Strip the customisation out and you give the client no reason to choose you over anyone else.
Did you know?
FigsFlow’s Proposal Analyzer scores your proposal against 13 parameters, each weighted by its impact on conversion, then flags exactly which ones to fix before you send. Source: FigsFlow Proposal Analyser.
The Two Ways to Customise Proposal Templates in FigsFlow
The two methods to customise proposal templates solve two different problems. One – you set up once and forget. The other you touch only when a specific client warrants it.
| Way 1: Template level | Way 2: Proposal level | |
|---|---|---|
| Scope | Every proposal you send | One client, one proposal |
| Controls | Branding, firm story, standard sections, email automation | Service descriptions, service specific testimonials, attachments, dynamic variables |
| You set it | Once | Per proposal, only when needed |
| Best for | Reflecting what your firm does and proves across all services | Adding proof and detail relevant to this client's situation |
Way 1 is the foundation. Way 2 is the exception.
Way 1: Customise the Template Behind Every Proposal
This is where you make the proposal template your own. Everything you set here applies to every proposal built from it, so it holds what stays constant across clients: your brand, your credentials, and the proof that lands whichever service a client picks. You build it once in Template Setup, and every future proposal inherits it.
Three tabs shape what the client sees.
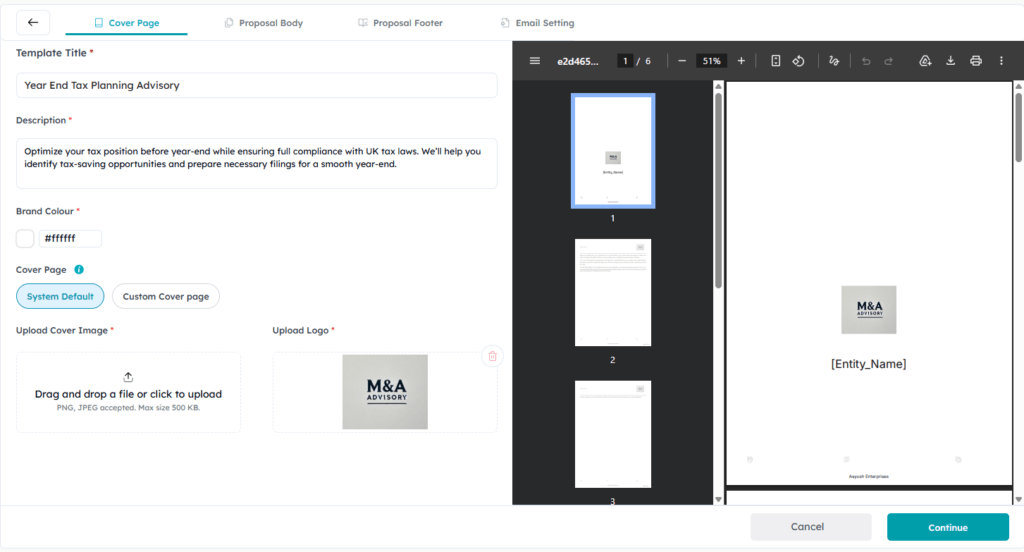
- Cover Page: the first impression, on your brand. Set the template title, a description, and your brand colour, then swap the system default for your own cover image (PNG or JPEG, up to 500 KB) and add your logo. The client opens to your firm, not a stock layout.
- Proposal Body: where trust is built. Arrange the blocks every client should read, Introduction, Our Fees, Terms and Conditions, Next Steps, and a Service Summary, then strengthen them with the Textbox, Image, and Testimonial tools or a Custom Page. This is the home for proof that applies to any prospect: your qualifications, your regulatory memberships, the testimonials that hold true regardless of the service.
- Proposal Footer: the details that never change. Fix your company name, a short description, contact number, email, website, the three address lines, and postcode in one place. Set once, it stays identical on every proposal, so nothing drifts as your team sends quotes.
Set the follow up once, then forget it.
The template’s Email Settings link a predefined email to each stage, so the right message sends itself. Client emails cover Send Live, Won, Signature Reminder, and Point of Contact. Staff emails cover Send Live, Won, and Lost. The chasing runs whether or not you remember to chase.
Way 2: Tailor a Single Proposal to One Client
Open the edit icon on a proposal’s preview to reach the Edit Proposal Report view. The pricing already filled in the client’s details, so most of this layer you leave alone. The move worth making is adding proof that fits this service and this client.
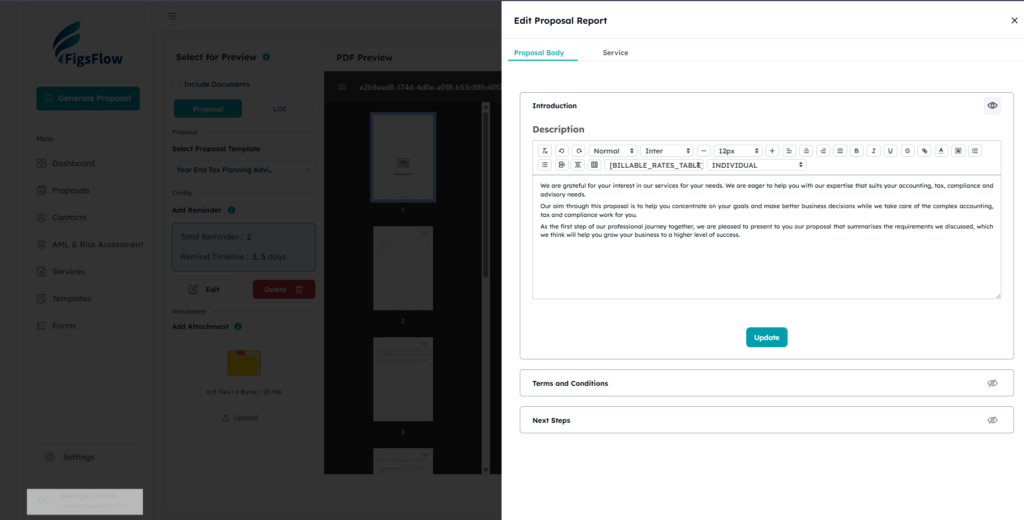
- Edit the service description only where it differs. Each service arrives with a default covering the statutory duty, deadlines, and scope. Change it where this client departs from the standard, leave it where it does not.
- Toggle blocks, do not rewrite them. Introduction, Terms, and Next Steps each have a switch. Turn off what does not apply. Curation, not authorship.
- Insert dynamic variables. Placeholders like
[CLIENT_NAME]and[BILLABLE_RATES_TABLE]fill themselves with live client and firm data when the proposal renders. - Attach proof that answers this prospect’s question. A service specific case study, or a review from a client in the same niche. A landlord’s testimonial lands harder on a property proposal than a generic five star average.
Which Method to Use, and When
The two methods are not either/or. They stack, and the order is what matters. A rule of thumb keeps your effort where it pays.
- Way 1 is your default. Branding, credentials, standard sections, and email automation hold true for every client, so they live in the template and apply on their own. Once it is set, most proposals need nothing more.
- Way 2 is the exception. Pricing has already made the proposal client specific, and the default descriptions already say the right thing. Reach for it only to add targeted proof, a testimonial or case study that speaks to this client’s situation.
Editing for its own sake spends the time the template was built to save.
Set your proposal template up once, and every proposal starts ahead of the last. Start a free trial and build your firm template before your next quote goes out.
Conclusion
Customisation works on two levels. The template holds what is true of your firm for every client. The individual proposal holds what is true of this client and this service.
Set the firm layer once and it pays you back on every proposal that follows, each one inheriting the same credible, consistent pitch. Leave it unset and you rebuild that story by hand every time, slower and never quite the same twice.
So before your next proposal goes out, ask yourself: does it show this client something a generic template never could?